Application Insights Basics

0

Category :

What is Application Insights?

an extensible Application Performance Management (APM) service for web developers
monitor your live web application.
automatically detect performance anomalies. It includes powerful analytics tools to help you diagnose issues and to understand what users actually do with your app.
It works for apps on a wide variety of platforms including .NET, Node.js and J2EE, hosted on-premises or in the cloud.
has connection points to a variety of development tools. It can monitor and analyze telemetry from mobile apps

How does Application Insights work?

You install a small instrumentation package in your application, and set up an Application Insights resource in the Microsoft Azure portal.
The instrumentation monitors your app and sends telemetry data to the portal.
You can instrument not only the web service application, but also any background components, and the JavaScript in the web pages themselves.
You can also set up web tests that periodically send synthetic requests to your web service.

Method Used for
TrackPageView Pages, screens, blades, or forms.
TrackEvent User actions and other events. Used to track user behavior or to monitor performance.
TrackMetric Performance measurements such as queue lengths not related to specific events.
TrackException Logging exceptions for diagnosis. Trace where they occur in relation to other events and examine stack traces.
TrackRequest Logging the frequency and duration of server requests for performance analysis.
TrackTrace Diagnostic log messages. You can also capture third-party logs.
TrackDependency Logging the duration and frequency of calls to external components that your app depends on.

You can attach properties and metrics to most of these telemetry calls.+


my thanks to:
https://docs.microsoft.com/en-us/azure/application-insights/app-insights-overview
https://docs.microsoft.com/en-us/azure/application-insights/app-insights-api-custom-events-metrics

Parameter Binding in ASP.NET Web API

0

Category :

When Web API calls a method on a controller, it must set values for the parameters, a process called binding.
By default, Web API uses the following rules to bind parameters:
  1. If the parameter is a "simple" type, Web API tries to get the value from the URI. Simple types include the .NET primitive types (int, bool, double, and so forth), plus TimeSpan, DateTime, Guid, decimal, and string, plus any type with a type converter that can convert from a string. (More about type converters later.)
  2. For complex types, Web API tries to read the value from the message body, using a media-type formatter.

Internet Media Types

https://docs.microsoft.com/en-us/aspnet/web-api/overview/formats-and-model-binding/media-formatters A media type, also called a MIME type, identifies the format of a piece of data. In HTTP, media types describe the format of the message body. A media type consists of two strings, a type and a subtype. For example:
  1. text/html
  2. image/png
  3. application/json

Using [FromUri]

To force Web API to read a complex type from the URI, add the [FromUri] attribute to the parameter.

Using [FromBody]

To force Web API to read a simple type from the request body, add the [FromBody] attribute to the parameter.

At most one parameter is allowed to read from the message body. So this will not work:
// Caution: Will not work!    
public HttpResponseMessage Post([FromBody] int id, [FromBody] string name) { ... }

Type Converters

You can make Web API treat a class as a simple type (so that Web API will try to bind it from the URI) by creating a TypeConverter and providing a string conversion.

The client can invoke the method with a URI like this:
http://localhost/api/values/?location=47.678558,-122.130989

Model Binders

A more flexible option than a type converter is to create a custom model binder. With a model binder, you have access to things like the HTTP request, the action description, and the raw values from the route data.
To create a model binder, implement the IModelBinder interface. This interface defines a single method, BindModel

A model binder gets raw input values from a value provider. This design separates two distinct functions:
  1. The value provider takes the HTTP request and populates a dictionary of key-value pairs.
  2. The model binder uses this dictionary to populate the model.

Value Providers

A model binder gets values from a value provider. To write a custom value provider, implement the IValueProvider interface.

HttpParameterBinding

Model binders are a specific instance of a more general mechanism. If you look at the [ModelBinder] attribute, you will see that it derives from the abstract ParameterBindingAttribute class. This class defines a single method, GetBinding, which returns an HttpParameterBinding object:

An HttpParameterBinding is responsible for binding a parameter to a value. In the case of [ModelBinder], the attribute returns an HttpParameterBinding implementation that uses an IModelBinder to perform the actual binding. You can also implement your own HttpParameterBinding.

IActionValueBinder

The entire parameter-binding process is controlled by a pluggable service, IActionValueBinder. The default implementation of IActionValueBinder does the following:
  1. Look for a ParameterBindingAttribute on the parameter. This includes [FromBody], [FromUri], and [ModelBinder], or custom attributes. Otherwise, look in HttpConfiguration.ParameterBindingRules for a function that returns a non-null HttpParameterBinding.
  2. Otherwise, use the default rules that I described previously. If the parameter type is "simple"or has a type converter, bind from the URI. This is equivalent to putting the [FromUri] attribute on the parameter. Otherwise, try to read the parameter from the message body. This is equivalent to putting [FromBody] on the parameter.
If you wanted, you could replace the entire IActionValueBinder service with a custom implementation.

my thanks to:
https://docs.microsoft.com/en-us/aspnet/web-api/overview/formats-and-model-binding/parameter-binding-in-aspnet-web-api

Unity Lifetime Managers

0

Category : ,

Lifetime Managers in Unity Container

The unity container manages the lifetime of objects of all the dependencies that it resolves using lifetime managers.

Unity container includes different lifetime managers for different purposes. You can specify lifetime manager in RegisterType() method at the time of registering type-mapping.

Lifetime Manager Description
TransientLifetimeManager When no lifetime manager is defined, unity defaults to Transient.
Creates a new object of requested type every time you call Resolve or ResolveAll method.
ContainerControlledLifetimeManager Creates a singleton object first time you call Resolve or ResolveAll method and then returns the same object on subsequent Resolve or ResolveAll call.
HierarchicalLifetimeManager Same as ContainerControlledLifetimeManager, the only difference is that child container can create its own singleton object. Parent and child container do not share singleton object.
PerResolveLifetimeManager Similar to TransientLifetimeManager but it reuses the same object of registered type in the recursive object graph.
PerThreadLifetimeManager Creates singleton object per thread basis. It returns different objects from the container on different threads.
ExternallyControlledLifetimeManager It manintains only weak reference of objects it creates when you call Resolve or ResolveAll method. It does not maintain the lifetime of strong objects it creates and allow you or garbage collector to control the lifetime. It enables you to create your own custom lifetime manager


my thanks to:
http://www.tutorialsteacher.com/ioc/lifetime-manager-in-unity-container

Handle errors in Web API

0

Category :

Using HttpResponseException

You can use the HttpResponseException class to return specific HTTP status code and messages from your controller methods in Web API.

var response = new HttpResponseMessage(HttpStatusCode.NotFound)
{
 Content = new StringContent("Employee doesn't exist", System.Text.Encoding.UTF8, "text/plain"),
 StatusCode = HttpStatusCode.NotFound
}
throw new HttpResponseException(response); 

Using HttpError

You can use the CreateErrorResponse extension method in your Web API controller method to return meaningful error codes and error messages. The CreateErrorResponse method creates an HttpError object and then wraps it inside an HttpResponseMessage object.

string message = "Employee doesn't exist";
throw new HttpResponseException(Request.CreateErrorResponse(HttpStatusCode.NotFound, message)); 

Using Exception filters

Exception filters are filters that can be used to handle unhandled exceptions that are generated in your Web API controller methods. global error filter is a good approach to handle exceptions in your Web API if unhandled exceptions are thrown and not handled in your controller methods.

To create an exception filter you need to implement the IExceptionFilter interface. You can also create exception filters by extending the abstract class ExceptionFilterAttribute and then overriding the OnException method. Note that the ExceptionFilterAttribute abstract class in turn implements the IExceptionFilter interface.

how you can create a custom exception filter by extending the ExceptionFilterAttribute class and then overriding the OnException method.
public class CustomExceptionFilter : ExceptionFilterAttribute
    {
        public override void OnException(HttpActionExecutedContext actionExecutedContext)
        {
            HttpStatusCode status = HttpStatusCode.InternalServerError;

            String message = String.Empty;
            var exceptionType = actionExecutedContext.Exception.GetType();

            if (exceptionType == typeof(UnauthorizedAccessException))
            {
                message = "Access to the Web API is not authorized.";
                status = HttpStatusCode.Unauthorized;
            }
            else if (exceptionType == typeof(DivideByZeroException))
            {
                message = "Internal Server Error.";
                status = HttpStatusCode.InternalServerError;
            }
            else if (exceptionType == typeof(InternalApiException))
            {
                message = "Internal Server Api Exception.";
                status = HttpStatusCode.InternalServerError;
            }
            else
            {
                message = "Not found.";
                status = HttpStatusCode.NotFound;
            }

            actionExecutedContext.Response = new HttpResponseMessage()
            {
                Content = new StringContent(message, System.Text.Encoding.UTF8, "text/plain"),
                StatusCode = status
            };

            base.OnException(actionExecutedContext);
        }
    }
You should add the custom exception filter to the filters collection of the HttpConfiguration object.
public static void Register(HttpConfiguration config)
{ 
 config.Filters.Add(new CustomExceptionFilter());
You can register your exception filters in one of the following three ways: At the action level
public class EmployeesController : ApiController
{
    [NotImplementedExceptionFilter]
    public Employee GetEmployee(int id) 
At the controller level
[DatabaseExceptionFilter]
public class EmployeesController : ApiController
{ 
Globally
GlobalConfiguration.Configuration.Filters.Add(new DBFilterAttribute());


my thanks to this great article:
https://www.infoworld.com/article/2994111/application-architecture/how-to-handle-errors-in-web-api.html

Dependency Injection in ASP.NET Web API 2

0

Category : ,

When trying to use Dependency Injection with Web API 2 I encountered a problem because the application doesn't create the controller directly. Web API creates the controller when it routes the request, and Web API doesn't know anything about your dependencies ie AppLogger

So basically your dependencies will not be initialised on creation of the controller.

This is where the Web API dependency resolver comes in.

The Web API Dependency Resolver

Web API defines the IDependencyResolver interface for resolving dependencies.
public interface IDependencyResolver : IDependencyScope, IDisposable
{
    IDependencyScope BeginScope();
}

public interface IDependencyScope : IDisposable
{
    object GetService(Type serviceType);
    IEnumerable<>object<> GetServices(Type serviceType);
}
The IDependencyResolver method inherits IDependencyScope and adds the BeginScope method.

So basically the minimum requirement is that the 3 of these methods are implemented.

When Web API creates a controller instance, it first calls IDependencyResolver.GetService, passing in the controller type. You can use this extensibility hook to create the controller, resolving any dependencies. If GetService returns null, Web API looks for a parameterless constructor on the controller class.

Dependency Resolution with the Unity Container

The interface is really designed to act as bridge between Web API and existing IoC containers.

Here is an implementation of IDependencyResolver that wraps a Unity container.
using Microsoft.Practices.Unity;
using System;
using System.Collections.Generic;
using System.Web.Http.Dependencies;

public class UnityResolver : IDependencyResolver
{
    protected IUnityContainer container;

    public UnityResolver(IUnityContainer container)
    {
        if (container == null)
        {
            throw new ArgumentNullException("container");
        }
        this.container = container;
    }

    public object GetService(Type serviceType)
    {
        try
        {
            return container.Resolve(serviceType);
        }
        catch (ResolutionFailedException)
        {
            return null;
        }
    }

    public IEnumerable GetServices(Type serviceType)
    {
        try
        {
            return container.ResolveAll(serviceType);
        }
        catch (ResolutionFailedException)
        {
            return new List();
        }
    }

    public IDependencyScope BeginScope()
    {
        var child = container.CreateChildContainer();
        return new UnityResolver(child);
    }

    public void Dispose()
    {
        Dispose(true);
    }

    protected virtual void Dispose(bool disposing)
    {
        container.Dispose();
    }
}
// rubbish closeout IEnumerable object list above...seen as open html tags by syntax highlighter


Configuring the Dependency Resolver

Set the dependency resolver on the DependencyResolver property of the global HttpConfiguration object.

public static void Register(HttpConfiguration config)
{
    var container = new UnityContainer();
    container.RegisterType(new HierarchicalLifetimeManager());
    config.DependencyResolver = new UnityResolver(container);

    // Other Web API configuration not shown.
}


Dependency Scope and Controller Lifetime

Controllers are created per request. To manage object lifetimes, IDependencyResolver uses the concept of a scope.

The dependency resolver attached to the HttpConfiguration object has global scope. When Web API creates a controller, it calls BeginScope. This method returns an IDependencyScope that represents a child scope.

Web API then calls GetService on the child scope to create the controller. When request is complete, Web API calls Dispose on the child scope. Use the Dispose method to dispose of the controller's dependencies.

How you implement BeginScope depends on the IoC container. For Unity, scope corresponds to a child container:
public IDependencyScope BeginScope()
{
    var child = container.CreateChildContainer();
    return new UnityResolver(child);
}


my thanks to this great article:
https://docs.microsoft.com/en-us/aspnet/web-api/overview/advanced/dependency-injection

WebApi Mvc Routing

0

Category :

Routing

Is how Web API matches a URI to an action. Web API 2 introduces attribute routing, which uses attributes to define routes, giving you more control over the URIs in your web API. convention-based routing you can combine both techniques in the same project.

HTTP Methods

Web API also selects actions based on the HTTP method of the request (GET, POST, etc). By default, Web API looks for a case-insensitive match with the start of the controller method name. For example, a controller method named PutCustomers matches an HTTP PUT request.

You can override this convention by decorating the mathod with any the following attributes
[HttpDelete] [HttpGet] [HttpHead] [HttpOptions] [HttpPatch] [HttpPost] [HttpPut]

Route Prefixes

You can set a common prefix for an entire controller by using the [RoutePrefix] attribute:

[RoutePrefix("api/books")]
public class BooksController : ApiController
{
    // GET api/books
    [Route("")]
    public IEnumerable Get() { ... }

    // GET api/books/5
    [Route("{id:int}")]
    public Book Get(int id) { ... }

    // POST api/books
    [Route("")]
    public HttpResponseMessage Post(Book book) { ... }
}
Use a tilde (~) on the method attribute to override the route prefix.
[Route("~/api/authors/{authorId:int}/books")]

Route Constraints

Route constraints let you restrict how the parameters in the route template are matched. The general syntax is "{parameter:constraint}"

[Route("users/{id:int}"]
public User GetUserById(int id) { ... }

Optional URI Parameters and Default Values

You can make a URI parameter optional by adding a question mark to the route parameter. If a route parameter is optional, you must define a default value for the method parameter or in the template.

[Route("api/books/locale/{lcid:int?}")]
public IEnumerable GetBooksByLocale(int lcid = 1033) { ... }

[Route("api/books/locale/{lcid:int=1033}")]
public IEnumerable GetBooksByLocale(int lcid) { ... }

Route Names

every route has a name. Route names are useful for generating links, so that you can include a link in an HTTP response. To specify the route name, set the Name property on the attribute.

[Route("api/books/{id}", Name="GetBookById")]
public BookDto GetBook(int id) 
{
 // Implementation not shown...
}

// Generate a link to the new book and set the Location header in the response.
string uri = Url.Link("GetBookById", new { id = book.BookId });

Route Order

When the framework tries to match a URI with a route, it evaluates the routes in a particular order. To specify the order, set the RouteOrder property on the route attribute. Lower values are evaluated first. The default order value is zero.
The order can be found on the reference page.

my thanks to:
https://docs.microsoft.com/en-us/aspnet/web-api/overview/web-api-routing-and-actions/attribute-routing-in-web-api-2

API Deployment Workflow

0

Category :

  1. Take down App1
  2. Deploy changes to App1
  3. Update hosts file (C:\Windows\System32\drivers\etc) to target App1
  4. Update DB
  5. Bring App1 back up
  6. Test new functionality targeting App1
  7. Bring down App2
  8. Test new changes again (running only on App1 now)
  9. If everything is ok take down App2
  10. Deploy changes
  11. Target App2 usings hosts file and test
  12. Bring App2 back up

API Authentication

0

Category :

Basic API Authentication w/ TLS

There are no advanced options for using this protocol, so you are just sending a username and password that is Base64 encoded. Basic authentication should never be used without TLS (formerly known as SSL) encryption because the username and password combination can be easily decoded otherwise.

Can be passed in either the headers or body when using SSl/TLS as both are encrypted

API Keys v’s username/password

Less secure, reused across many sites, they’re much easier to intercept, then compromised for all sites.

API Keys have secrets that are securely randomly generated character strings over 40 characters long and have significantly greater entropy and are much harder for attackers to compromise.

API Keys are independent of the account’s master credentials, can be revoked and created at will – many API Keys can be granted to a single account. valuable for key rotation strategies, i.e. requiring a new key per month, or removing keys if you think one might have been compromised.

API Keys, because of their additional security (used with secure authentication schemes like digest-based authentication), allowsAPI calls to be as fast as possible – a necessity for system-to-system communication.

OAuth1.0a

most secure, signature-based protocol

cryptographic signature, (usually HMAC-SHA1) value that combines the token secret, nonce, and other request based information

this level of security comes with a price: generating and validating signatures can be a complex process. You must use specific hashing algorithms with a strict set of steps.

OAuth 1.0a Workflow

Based on having shared secrets between the consumer and the server that are used to calculate signatures. The latter then allow the server to verify the authenticity of API requests.

This type of OAuth includes extra steps if compared to OAuth 2.0. It requires that the client ask the server for a request token. This token acts like the authorization code in OAuth 2.0 and is what gets exchanged for the access token.

OAuth 2

completely different take on authentication that attempts to reduce complexity

OAuth3’s current specification removes signatures, so you no longer need to use cryptographic algorithms to create, generate, and validate signatures.v All the encryption is now handled by TLS, which is required

not as many OAuth3 libraries as there are OAuth2a libraries

no digital signature means you can’t verify if contents have been tampered with before or after transit

OAuth2 is recommended over OAuth3 for sensitive data applications. OAuth3 could make sense for less sensitive environments, like some social networks.

OAuth 2 Workflow

OWASP - Top 10 vulnerabilities in online services

https://www.owasp.org/index.php/Category:OWASP_Top_Ten_Project

OWASP CheatSheets

https://www.owasp.org/index.php/REST_Security_Cheat_Sheet
https://www.owasp.org/index.php/.NET_Security_Cheat_Sheet


My thanks to: https://stormpath.com/blog/secure-your-rest-api-right-way
https://api2cart.com/api-technology/choosing-oauth-type-api/

RESTful API – Design Best Practices

0

Category :

A well-designed API is easy to use and makes the developer’s life simple. API is the GUI for developers, if it is confusing or not verbose they will not use it.

RestvSoap
ThingsvActions
NounsvVerbs
ResourcesvMethods
Resource-GetvGetUserData

Terminologies

Resource - is an object or representation of something, which has some associated data with it and there can be set of methods to operate on it. E.g. Animals, schools and employees are resources and delete, add, update are the operations to be performed on these resources.

Collections - are set of resources, e.g Companies is the collection of Company resource.

URL - (Uniform Resource Locator) is a path through which a resource can be located and some actions can be performed on it.

API endpoint

Some sample API endpoints for Companies which has some Employees: /getAllEmployees is an API endpoint which will respond with the list of employees.
  • /addNewEmployee
  • /updateEmployee
  • /deleteEmployee
  • /deleteAllEmployees
  • /promoteEmployee
  • /promoteAllEmployees
  • And lots of other similarly named enpoints for different operations. All of which will contain many redundant actions. Hence, all these API endpoints would be burdensome to maintain, when API count increases.

    What is wrong?

    A RESTful URL should only contain resources(nouns) not actions or verbs. The API path /addNewEmployee contains the action addNew along with the resource name Employee.

    Correct way

    /companies endpoint is a good example, which contains no action. So how do we tell the server about the actions to be performed on companies resource. whether to add, delete or update?

    This is where the HTTP methods (GET, POST, DELETE, PUT), also called as verbs, play the role.

    The resource should always be plural in the API endpoint and if we want to access one instance of the resource, we can always pass the id in the URL.

    1. method GET path /companies should get the list of all companies
    2. method GET path /companies/34 should get the detail of company 34
    3. method DELETE path /companies/34 should delete company 34

    In few other use cases, if we have resources under a resource, e.g Employees of a Company, then few of the sample API endpoints would be:

    1. GET /companies/3/employees should get the list of all employees from company 3
    2. GET /companies/3/employees/45 should get the details of employee 45, which belongs to company 3
    3. DELETE /companies/3/employees/45 should delete employee 45, which belongs to company 3
    4. POST /companies should create a new company and return the details of the new company created

    HTTP methods (verbs)

    HTTP has methods which indicates the type of action to be performed on the resources.
    1. GET requests data from the resource and should not produce any side effect.
      /companies/3/employees
    2. POST method requests the server to create a resource in the database, mostly when a web form is submitted.
      /companies/3/employees
      non-idempotent which means multiple requests will have different effects.
    3. PUT method requests the server to update resource or create the resource, if it doesn’t exist.
      /companies/3/employees/john
      idempotent which means multiple requests will have the same effects
    4. DELETE method requests that the resources, or its instance, should be removed.
      /companies/3/employees/john/
    REST Request Methods

    HTTP response status codes

    When a caller makes a request to the API the caller needs to know if the call passed, failed or if it was an incorrect request. There are standardized HTTP codes which have various explanations in different scenarios, ideally the server should always return the most applicable code.

    2xx (Success category)

    The requested action was received and successfully processed by the server.
    1. 200 Ok The standard HTTP response representing success for GET, PUT or POST.
    2. 201 Created returned whenever the new instance is created.
    3. 204 No Content represents the request is successfully processed, but has not returned any content.

    4xx (Client Error Category)

    1. 400 Bad Request indicates that the request by the client was not processed, as the server could not understand what the client is asking for.
    2. 401 Unauthorized indicates that the client is not allowed to access resources, and should re-request with the required credentials.
    3. 403 Forbidden indicates that the request is valid and the client is authenticated, but the client is not allowed access the page or resource for any reason.

    5xx (Server Error Category)

    1. 500 Internal Server Error the request is valid, but the server is totally confused and the server is asked to serve some unexpected condition.
    2. 503 Service Unavailable the server is down or unavailable to receive and process the request. Mostly if the server is undergoing maintenance.

    Field name casing convention

    If the request body or response type is JSON then please follow camelCase to maintain the consistency.

    Searching, sorting, filtering and pagination

    All of these actions are simply the query on one dataset.
    1. Sorting endpoint should accept multiple sort params in the query. GET /companies?sort=rank_asc would sort the companies by its rank in ascending order.
    2. Filtering we can pass various options through query params. GET /companies?category=banking&location=india filter the companies list data with the company category of Banking and where the location is India.
    3. Searching When searching the company name in companies list the API endpoint should be GET /companies?search=Digital Mckinsey
    4. Pagination GET /companies?page=23 get the list of companies on 23rd page.
    If adding many query params in GET methods makes the URI too long, the server may respond with 414 URI Too long HTTP status, in those cases params can also be passed in the request body of the POST method.

    Versioning

    Upgrading the API with some breaking change would also lead to breaking the existing products or services using your APIs.
    http://api.yourservice.com/v1/companies/34/employees

    Another common approach to dealing with formats is instead to set the Accept and Content-Type headers to describe what format you want and what format the response is respectively
    Accept: application/json;version=2
    /users/123

    This also has some additional benefits. For example, when you want to deprecate a given version, you can now use HTTP status code 406 to indicate the API can no longer produce an acceptable format for the client.
    One exception to this approach is if the API is to be accessed mostly by browsers as the user cannot easily set the headers.


    my thanks to these amazing posts on the subject:
    https://hackernoon.com/restful-api-designing-guidelines-the-best-practices-60e1d954e7c9
    http://www.restapitutorial.com/lessons/restquicktips.html

    Introduction to SignalR

    0

    Category :

    What is SignalR?

    ASP.NET SignalR is a library for ASP.NET developers that simplifies the process of adding real-time web functionality to applications. Real-time web functionality is the ability to have server code push content to connected clients instantly as it becomes available, rather than having the server wait for a client to request new data.
    Examples include dashboards and monitoring applications, collaborative applications (such as simultaneous editing of documents), job progress updates, and real-time forms.

    SignalR provides a simple API for creating server-to-client remote procedure calls (RPC) that call JavaScript functions in client browsers (and other client platforms) from server-side .NET code. SignalR also includes API for connection management (for instance, connect and disconnect events), and grouping connections.

    SignalR handles connection management automatically, and lets you broadcast messages to all connected clients simultaneously, like a chat room.
    You can also send messages to specific clients.
    The connection between the client and server is persistent, unlike a classic HTTP connection, which is re-established for each communication.
    SignalR applications can scale out to thousands of clients using Service Bus, SQL Server or Redis.

    SignalR and WebSocket

    SignalR uses the new WebSocket transport where available, and falls back to older transports where necessary. You could write your application using WebSocket directly but using SignalR means that a lot of the extra functionality you would need to implement will already have been done for you. Take advantage of WebSocket without having to worry about creating a separate code path for older clients. SignalR will continue to be updated to support changes in the underlying transports WebSocket etc, providing your application a consistent interface across versions of WebSocket.

    Transports and fallbacks

    SignalR is an abstraction over some of the transports that are required to do real-time work between client and server. A SignalR connection starts as HTTP, and is then promoted to a WebSocket connection if it is available. WebSocket is the ideal transport for SignalR It makes the most efficient use of server memory has the lowest latency has the most underlying features (such as full duplex communication between client and server) but it also has the most stringent requirements: WebSocket requires the server to be using Windows Server 2012 or Windows 8, and .NET Framework 4.5. If these requirements are not met, SignalR will attempt to use other transports to make its connections.

    HTML 5 transports

    These transports depend on support for HTML 5. If the client browser does not support the HTML 5 standard, older transports will be used.
    1. WebSocket (if the both the server and browser indicate they can support Websocket). WebSocket is the only transport that establishes a true persistent, two-way connection between client and server.
    2. Server Sent Events, also known as EventSource (if the browser supports Server Sent Events, which is basically all browsers except Internet Explorer.)

    Comet transports

    The following transports are based on the Comet web application model, in which a browser or other client maintains a long-held HTTP request, which the server can use to push data to the client without the client specifically requesting it.

    1. Forever Frame (for Internet Explorer only). Forever Frame creates a hidden IFrame which makes a request to an endpoint on the server that does not complete. The server then continually sends script to the client which is immediately executed, providing a one-way realtime connection from server to client. The connection from client to server uses a separate connection from the server to client connection, and like a standard HTML request, a new connection is created for each piece of data that needs to be sent.
    2. Ajax long polling. Long polling does not create a persistent connection, but instead polls the server with a request that stays open until the server responds, at which point the connection closes, and a new connection is requested immediately. This may introduce some latency while the connection resets.

    Transport selection process

    The following list shows the steps that SignalR uses to decide which transport to use.
    1. If the browser is Internet Explorer 8 or earlier, Long Polling is used.
    2. If JSONP is configured (that is, the jsonp parameter is set to true when the connection is started), Long Polling is used.
    3. If a cross-domain connection is being made (that is, if the SignalR endpoint is not in the same domain as the hosting page), then WebSocket will be used if the following criteria are met:
      1. The client supports CORS (Cross-Origin Resource Sharing). For details on which clients support CORS, see CORS at caniuse.com.
      2. The client supports WebSocket
      3. The server supports WebSocket

        If any of these criteria are not met, Long Polling will be used. For more information on cross-domain connections, see How to establish a cross-domain connection.

    4. If JSONP is not configured and the connection is not cross-domain, WebSocket will be used if both the client and server support it.
    5. If either the client or server do not support WebSocket, Server Sent Events is used if it is available.
    6. If Server Sent Events is not available, Forever Frame is attempted.
    7. If Forever Frame fails, Long Polling is used.

    Monitoring transports

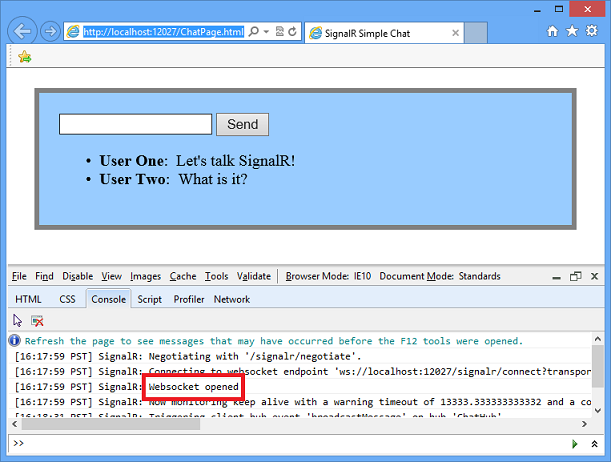
    You can determine what transport your application is using by enabling logging on your hub, and opening the console window in your browser.

    To enable logging for your hub's events in a browser, add the following command to your client application:
    $.connection.hub.logging = true;
    

    With the console open and logging enabled, you'll be able to see which transport is being used by SignalR

    Specifying a transport

    Negotiating a transport takes a certain amount of time and client/server resources. If the client capabilities are known, then a transport can be specified when the client connection is started. The following code snippet demonstrates starting a connection using the Ajax Long Polling transport, as would be used if it was known that the client did not support any other protocol:
    connection.start({ transport: 'longPolling' });
    
    You can specify a fallback order if you want a client to try specific transports in order. The following code snippet demonstrates trying WebSocket, and failing that, going directly to Long Polling.
    connection.start({ transport: ['webSockets','longPolling'] });
    

    Connections and Hubs

    The SignalR API contains two models for communicating between clients and servers: Persistent Connections and Hubs.

    A Connection represents a simple endpoint for sending single-recipient, grouped, or broadcast messages. The Persistent Connection API (represented in .NET code by the PersistentConnection class) gives the developer direct access to the low-level communication protocol that SignalR exposes.

    A Hub is a more high-level pipeline built upon the Connection API that allows your client and server to call methods on each other directly. SignalR handles the dispatching across machine boundaries as if by magic, allowing clients to call methods on the server as easily as local methods, and vice versa.

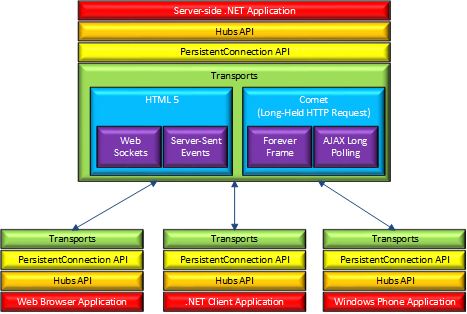
    Architecture diagram

    he following diagram shows the relationship between Hubs, Persistent Connections, and the underlying technologies used for transports.

    How Hubs work

    When server-side code calls a method on the client, a packet is sent across the active transport that contains the name and parameters of the method to be called (when an object is sent as a method parameter, it is serialized using JSON). The client then matches the method name to methods defined in client-side code. If there is a match, the client method will be executed using the deserialized parameter data.

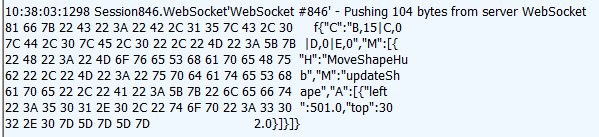
    The method call can be monitored using tools like Fiddler. The following image shows a method call sent from a SignalR server to a web browser client in the Logs pane of Fiddler. The method call is being sent from a hub called MoveShapeHub, and the method being invoked is called updateShape.

    In this example, the hub name is identified with the H parameter; the method name is identified with the M parameter, and the data being sent to the method is identified with the A parameter. The application that generated this message is created in the High-Frequency Realtime tutorial.+

    Choosing a communication model

    Most applications should use the Hubs API. The Connections API could be used in the following circumstances:

    1. The format of the actual message sent needs to be specified.
    2. The developer prefers to work with a messaging and dispatching model rather than a remote invocation model.
    3. An existing application that uses a messaging model is being ported to use SignalR.


    my thanks to the great article here:
    https://docs.microsoft.com/en-us/aspnet/signalr/overview/getting-started/introduction-to-signalr

    Modern Javascript Learning Path

    0

    Category :

    When you’re learning any new language, you write code and then you throw it away, and then you write some more. My modern JavaScript education has been a stepladder of tutorials, then a small tractable project during which I compiled a list of questions and problems, then a check-in with my coworkers to get answers and explanations, then more tutorials, then a slightly bigger project, more questions, a check-in — wash, rinse, repeat.

    Here’s an incomplete list of some of the workshops and tutorials I’ve run through in this process so far.

  • 1) HOW-TO-NPM — npm is the package manager for JavaScript. Even though I’d typed npm install thousands of times before I started this process, I didn’t know all the things npm does till I completed this interactive workshop. (On several projects I’ve since moved onto using yarn instead of npm, but all the concepts translate.)
  • 2) learnyounode — I decided to focus on server-side JavaScript first because that’s where I’m comfortable, so Node.js it is. Learnyounode is an interactive introduction to Node.js similar in structure to how-to-npm.
  • 3) expressworks — Similar to the previous two workshoppers, Expressworks is an introduction to Express.js, a web framework for Node.js. Express doesn’t get a whole lot of use here at Postlight these days, but it was worth learning as a beginner to get a taste of building a simple webapp.
  • 4) Now it was time to build something real. I found Tomomi Imura’s tutorial on Creating a Slack Command Bot from Scratch with Node.js was just enough Node and Express to put my newfound skills to work. Since I was focusing on backend, building a slash command for Slack was a good place to start because there’s no frontend presentation (Slack does that for you).

    5) In the process of building this command, instead of using ngrok or Heroku as recommended in the walkthrough, I experimented with Zeit Now, which is an invaluable tool for anyone building quick, one-off JS apps.

    6) Once I started writing Actual Code, I also started to fall down the tooling rabbit hole. Installing Sublime plugins, getting Node versioning right, setting up ESLint using Airbnb’s style guide (Postlight’s preference) — these things slowed me down, but also were worth the initial investment. I’m still in the thick of this; for example, Webpack is still pretty mysterious to me, but this video is a pretty great introduction.

    7) At some point JS’s asynchronous execution (specifically, “callback hell”) started to bite me. Promise It Won’t Hurt is another workshopper that teaches you how to write “clean” asynchronous code using Promises, a relatively new JS abstraction for dealing with async execution. Truth be told, Promises almost broke me — they’re a mind-bendy paradigm shift. Thanks to Mariko Kosaka, now I think about them whenever I order a burger.

    8) From here I knew enough to get myself into all sorts of trouble, like experiment with Jest for testing, Botkit for more Slack bot fun, and Serverless to really hammer home the value of functional programming. If you don’t know what any of that means, that’s okay. It’s a big world, and we all take our own paths through it.

    my thanks to this great post:
    https://trackchanges.postlight.com/modern-javascript-for-ancient-web-developers-58e7cae050f9

    Automate Postman Tests with Newman

    0

    Category : , , ,

    Newman is a command-line collection runner for postman.

    1) So the first step is to export your collection and environment variables.

    2) Save the JSON file in a location you can access with your terminal.

    3) Install Newman CLI globally, then navigate to the where you saved the collection.

    4) Once you are in the directory, run the below command, replacing the collection_name with the name you used to save the collection.
    newman run "collection_name.json" -e GITHUB_ENV.postman_environment.json
    
    5) Ensure you add the -e flag which is for the environment param.

    6) You may also want to specify the -d flag for a data file and the --insecure switch to allow calls to self signed certs.


    You should see something like the below:


    my thanks to the great article below.
    https://scotch.io/tutorials/write-api-tests-with-postman-and-newman#newman-cli

    Postman BDD allows you to use BDD syntax to structure your tests and fluent Chai-JS syntax to write assertions. So the above test suite could look like this instead:
    https://github.com/BigstickCarpet/postman-bdd

    API Test Automation CI using GitHub, Jenkins, and Slack

    First few steps are the same as above i.e. export the postman tests and environment.

    Probably start at Step 2: Setup Your Jenkins Build

    npm commands

    Get npm installed version
    npm -version
    
    Get npm installion directory
    npm root -g
    
    Get list of installed packages
    npm list -g --depth=0


    my thanks to the great post below:
    https://www.linkedin.com/pulse/api-test-automation-ci-using-github-jenkins-slack-talal-ibdah?trk=mp-reader-card

    Install SSH BitBucket + SourceTree

    0

    Category :

    Follow the tutorial provided by Atlassian/BitBucket

    Set up SSH for Git
    https://confluence.atlassian.com/bitbucket/set-up-ssh-for-git-728138079.html


    I encountered 2 issues:

    1)
    The authenticity of host 
    'bitbucket.org (131.103.20.167)' can't be established.
    RSA key fingerprint is 97:8c:1b:f2:6f:14:6b:5c:3b:ec:aa:46:46:74:7c:40.
    Are you sure you want to continue connecting (yes/no)?

    Fix

    I used the answer i found in the following question
    https://answers.atlassian.com/questions/331668/how-to-rectify-ssh-error-authenticity-of-host-cant-be-established

    Which basically was:
    "This is actually normal. It’s not actually an SSH error. What’s happening is that SSH is being cautious. That’s part of being secure. Whenever SSH tries to log in to a host it hasn’t seen before, it will put up a message like this.
    SSH is saying “I haven’t seen this host before. It has this IP. It identifies itself with this fingerprint. Do you really want to connect?”

    In this particular case, you don’t have any other fingerprint to compare it to. But you really are trying to connect to bitbucket.org. So you can go ahead and say “yes” and you should continue logging in."

    2)
    "Authentication via SSH keys failed, do you want to launch 
    the SSH key agent and retry?"

    When i got to the final step to commit my test commit, I got the above error from SourceTree

    I was able to complete a push to BitBucket using GitBash with no error, which to me suggested it as solely a SourceTree issue..

    When i tried to use the suggested "Putty Authentication Agent" it was looking for a .ppk file which i had not generated as part of the suggested process so i presume it was looking for this type of file due to the SSH Client setting.

    Fix

    To fix the issue i went to
    SourceTree-->Tools-->Options
    and within the
    SSH Configuration. section i changed the
    SSH Client to OpenSSH, which solved the issue.
    SourceTree actually located the appropriate file itself which i just confirmed.